Saturday, July 2, 2011

/kɔk/

One challenge with this job was finding an unobtrusive caulk.  Caulking where the siding meets the corners and window/door trim is a necessity since we re-use (whenever possible) boards in the same location they were removed from. This means that we don't cut those boards to length and are stuck with the tolerances the house was originally built to. Since it was built to have the joints caulked and everything painted, the gaps aren't negligible.

I tried a number of colored caulkings that I was able to pick up locally. I tried DAP Alex Plus in Dark Bronze (way too dark), Cedar Tan (way too light), and Brown (too brown ... our siding has more of a reddish hue). I also tried Big Stretch in Redwood (too red ... our siding has more of a brownish hue) and Woodtone (too brown and too light).  You can apply the Sikkens finish on top of these and that helps with the match in all cases, but none of them were very good.

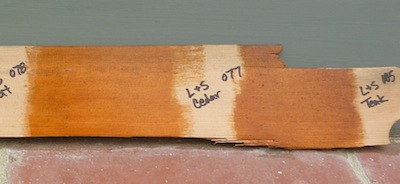
The answer to our problem came from the log-home-building industry.  A company called Timber Edge Products, LLC out of Minden, NV manufactures a line of caulkings called Timber Match in the following woodsy colors

The colors in which Timber Match caulking is available.

that are intended for log-home building.  They were kind enough to send me samples (Cedar, Redwood, and Café) and the Café works really nicely.  The picture below shows one of the caulked joints.  Looking at the house, you don't notice the joint at all unless you are looking for it.  I may try some of the Sikkens finish on top of the caulking to bring it even closer to the color of the wood, but this is an excellent match to begin with.

This image shows the caulking of the joint where the siding meets the cornerboards.

Thursday, June 30, 2011

Preview

We have now completed the residing project on three sides of the garage. The image below shows the back of the garage with the siding reinstalled. The new-to-us salvaged window also shows off what will be the house's paint scheme: Green Cast (0409) and Ocean Melody (0499) from Miller Paint. The gutters and soffit will be painted in the green color as well.

West side of the garage.
The next picture shows the southwest corner of the garage. You can see the mahogany doors that we added. You can also see delicious peas in the foreground. I still need to finish painting the trim around the door and add some hardware.

Southwest corner of the garage.
The final picture shows the front of the garage, which is still sporting our previous (and controversial) accent color on the garage door.  The pile of siding in the driveway is awaiting sanding and finishing.  On the right, you can see the house, which is currently down to sheathing—that's where the pile of siding came from.

Front of the garage.

Tuesday, May 17, 2011

Waiting for the Sun

All of the siding has now been removed from the garage. Very few of the boards were broken in deconstruction, although several developed some splitting near the thin edge.  I glued these boards back together with Titebond III wood glue. With these repairs, we expect to be able to reuse 85-90% of the siding. Our original estimate of how much siding we could salvage turned out to be very conservative, which is great news.

The south wall of the garage with all the siding removed.  The southwest corner of the garage had some old (and long-ago-repaired) insect damage, but overall the structure is in great shape.

We have been waiting for the weather to cooperate so that we can get these boards stained and reinstalled.  What we've done so far: the region of unpainted wood on the (formerly front and soon to be) back side of the siding has been primed with Zinsser Allprime, the nail holes have been filled with ZAR Wood Patch, the painted edge of the boards has been cut off, and the (formerly back and soon to be) front side of the siding has been sanded to 120 grit.  The sanding is an enormous job, and I underestimated the time that it would take.  Some of the boards have more prominent mill marks than my test board did, so they require a lot more sanding.  It took about sixteen hours to sand all the boards removed from the garage and I had estimated twenty hours for both the house and the garage, so I underestimated by probably a factor of 3!

The removed siding stacked inside the garage.  All of the boards have been primed, cut, and sanded.  The single dark board in the center has been finished with Cetol Log & Siding stain in Teak.
So there has been some good (salvage percentage is high) and some bad (sanding takes forever), but we applied the finish to a piece of siding and it looks gorgeous.  Currently, we have high hopes that we will end up with a home that is beautiful and unique, and that we will do so with virtually no environmental impact.

Siding board with the Cetol Log & Siding stain applied. You can see an example of a filled nail hole near the bottom of the board.  

Thursday, May 5, 2011

Finishes

The folks at Powell Paint Center applied some of the available finishes to one of the boards that was broken during the deconstruction process.  From right to left, the finishes are Cetol Log & Siding in three colors: Teak (085), Cedar (077), and Natural (078), and ArborCoat Transparent Deck & Siding in Cedar (637-40).


The Cetol Natural and the ArborCoat Cedar are too light for this application as the discoloration in the reclaimed wood really stands out, especially with the ArborCoat.  I purposely did a mediocre job of sanding down this board so that we could pick a finish that looked good even if every board isn't sanded to perfection.

Cetol Log & Siding Cedar (left) and Teak (right).
Above is a close-up of the two finishes that look good.  We're leaning toward the Teak finish because the darker and browner finish does an even better job of blending all the tones of the reclaimed wood together.  This is an extreme closeup of the Teak finish under artificial light:


It would be nice to see how these finishes look in bright sunlight, but this being Portland, we may or may not get that opportunity before we need to pull the trigger on one of these.

Saturday, April 9, 2011

Egress

This week, we went shopping at the ReBuilding Center in Portland and found these great double-hung windows for the west wall of the garage. The windows and attached trim are almost identical in style to the house's original windows, so they'd fit right in if there were any original windows left, which there won't be after we tear out the last one to replace it with these windows.


We also picked up a pair of doors to install on the south wall, opening onto the yard.  These are some serious doors—solid mahogany, and with some pretty snazzy hardware from their commercial life. 


We hope to start removing the siding within a week or two. This depends to some degree on the weather; we're hoping to avoid another year like 2010.

Wednesday, March 23, 2011

Baby Steps

We've finally made enough of the necessary decisions to get started on the project.  We decided to begin with the garage to keep the project manageable as we continue to learn how to do this job properly.  For example, we are imagining laying out all of the siding in our basement while we apply the finish, but the house has more square footage of siding than of basement.

To make up for the material that will be lost in deconstruction, we've decided to add French doors to the south side of the garage and reside the north side of the garage in a different material.  Since the north side of the garage forms one half of a breezeway going to the backyard, it seems natural to use a different material in this area.  In addition, the boards on the breezeway make up almost a quarter of the house's siding, comparable to the amount we expect to lose in deconstruction, so if things go as planned, we won't run out of boards for the project because of what we save from this area.

Right now, we are considering tongue-and-groove cedar siding, installed vertically, for the breezeway, but we'll look around for some other options. Ideally, we'd like to use reclaimed wood for the vertical siding; brand-new boards wouldn't match the siding on the rest of the house as well. We'd also like to find a salvaged set of French doors and a larger window to replace the one on the west side of the garage. Luckily, the nearby ReBuilding Center and ReStore are good sources for this sort of thing. This SketchUp drawing of the garage shows the vertical siding on the north side and the additional door on the south side. It also shows one possible color scheme: "Asparagus" trim and "Cayenne" doors.


As far as refinishing the siding, we've abandoned the planer idea in favor of sanding down all the boards. The problem with the planer is that the outside surface of the boards is bumpy from where all of the patching material is installed, and in all likelihood, this uneveness will translate to the side we're trying to finish when we run it through the planer.  My experiments show that I can sand the boards using a random orbital sander with 60 and then 150 grit at a pace of about one foot per minute, so to do all of the siding from the whole house, we are looking at 20 hours of sanding; not too bad.

Monday, March 14, 2011

What are we thinking?

We first need to figure out whether reusing this cedar siding is a wise decision. We have about 1500 linear feet of siding on the house. Our conservative estimate is that we'll salvage 75% of the siding; the rest of it will either break or no longer fit when reversed.  That means that we can expect to end up with 1100+ feet of reusable siding.

Next, what will it cost to get the siding ready to go back up on the house?  A local deconstruction company gave a bid of $1600 to remove all the siding.  The back side of the cedar is unpainted and rough (see below). In order to get the boards ready for residing, we need to (a) cut the painted edge off each board and (b) get a smooth surface on the unpainted side.  The smooth surface could be achieved either by sanding, as in the picture below, or by running the boards through a planer.  The latter option requires building a jig to run the beveled boards through the planer.  A local millwork shop thought they might be able to get the job done for about $1000, but they'd never done anything like it, so it was going to be an experiment.  Sanding would probably cost a similar amount.

Top: taken directly from the house.  Bottom: sanded to 120 grit.

Rounding up, then, we should expect to spend roughly $3000 to end up with 400 feet less of siding than we started with. That's much less than the cost of buying new clear cedar siding, but our siding will have nail holes and staining; it won't look like new siding. In some ways, that's a good thing. As Coop15 points out on their blog, modern cedar siding has fewer than 10 growth rings per inch, making it weaker and less rot resistant than the wood that was used 60 years ago.  You can see our siding's dense growth rings in the picture below.

Closeup of siding removed from house showing growth rings.

There are also subjective considerations. Over the past 18 months, we've grown quite attached to our siding, and we feel somewhat responsible for the cosmetic damage that was inflicted on it. It's done its job for more than 60 years, and it doesn't seem right to send it to a landfill when it clearly still has so much to give.